Darling Butterfly

Followers

10/30/2011

Starry Night

      Hello my crafty friend, I'm so glad you came by to check out my blog. A couple of weeks ago I entered a card into a challenge that required their be stars on the card or project. The theme for the challenge is a greeting card so I made this quick and easy Christmas card to help me get my cards done for the up coming season.
     I took a card base and used my score tool to make a rectangle 1/4" in from the outer edge, then made four more score lines across the middle section of the card leaving a space in between number 2 and number 3 to add my embellishment. I stamped the upper half with my sentiment by Hero Arts and the lower half with a scene of Bethlehem from an Inkadinkadoo set. I traced the embossed lines with a gold gel pen, and used gold ink pad for the sentiment and image. I cut out the swirly embellishment from my Fanciful Holiday Spellbinders die set in shiny gold paper and adhered across the centre.
Challenges 

     I hope you enjoyed my post about my starry night card and it encouraged you to start or continue working on your Christmas card list. If you like it please leave me a comment, I truly appreciate each and every comment, they make me feel happy and encourage me to keep creating things to share with you. I hope you have a blessed day and happy crafting!  :)

Cindy

Table setting place cards

     Hello my crafty friend, thank you so much for stopping by my blog to see what I have been up to. I am enjoying entering challenges and one of the sites I play at is called The Outlawz. They have a new challenge starting everyday and running for one week each. Sundays challenge this week was to make a CAS card or project using a leaf or leaves as your focal point. I decided to make a place setting card for Thanksgiving even though it has passed here in Canada. I have a lot of American friends and some family members that live in the states and these are in honour of all of them. :)
     I was working on a set of four and having some difficulty cutting out my sentiments on the cricut, most of the sentiments are meant to be cut out for scrapbooking pages rather than cards, the smaller size makes the cuts rather thin and extremely delicate.  My first place card has the delicate sentiment on it, and I had a rather pretty leafy image I was going to cut out for the top section but figured that it probably wouldn't cut out very nicely either since the swirly part of it was also very thin. I ended up resorting to my spellbinders dies for some leaves from the sunflowers set, and a couple flourishes from a sizzix die.
     After I finished this place card and uploaded it to the challenge I realized it was supposed to be a CAS card. For some reason I was thinking of Saturday's Paper Ala Mode challenge when I was designing this on my gypsy. So I quickly whipped up another one of the place cards and this is the one I tagged to enter in the challenge. I like this one but it's still not as CAS as it would have been on a regular size card. Oh well, this is the only Happy Thanksgiving stamp I had so it will have to do. :) Tomorrow I will make two more of each place card, or I might make them each different as well, everyone is unique why not have a unique place setting card each right?  We will see what tomorrow brings I guess. 


Challenges
I am entering the second card into The Outlawz CAS challenge 
I am entering the set of 4 into the Paper Cutz Challenge  : turning over a new leaf
and into the Make It Monday Challenge #61
     I hope you like my project and I have inspired you to get creative. If you like my project please leave me a comment and let me know which one is your favourite?  Have yourself a blessed day and happy crafting!

Cindy

10/29/2011

Gift Tag


     Hello my crafty friend, thank you so much for popping in to see what's new on my blog. I made this tag for a challenge over at The Outlawz. I know most of you very talented crafters make amazing tags and I would love to make one like that someday. I just don't know where to start, there's so many ways to do it, things to add etc I kind of feel intimidated by them. So I made a christmas gift tag, who doesn't need one or a couple dozen of these every year, lol. Hope you like it....


Challenges

     I made this tag with the lrg ornament shaped die from my Quickutz limited edition 2008 Holiday gift set. Cut once in the shiny red, and once in white, I put a piece of silver just to cover the hanger part and cut once, and cut a strip of patterned paper and laid across the middle section and cut. The holly leaves and berries are from the same set. 
     I hope you like it and it gives you an idea for some gift tags you might want to make this year. Hope you drop by again and see what else I've been up to. Have yourself a scrap happy day :)

                                                                                                                                     Cindy

10/28/2011

My cricut "punch" roses

     Hello my crafty friend, today I thought I would share the roses I make with you.  When I make roses or other flowers I generally like to make extra's and with these being so easy I make 30 roses at a time. I originally made these using a five flower punch.  I saw a youtube video on how to one night and can't seem to relocate it. Anyway using a punch to make them at 5 flowers per rose, is not only time consuming but it is painful for me.  Soooo I decided heyyyy I have DS and a Cricut, and I know how to use em, design them!!!  ;) LOL
     I used a circle and 5 tear drop shapes from a cricut cartridge and welded together to design these. I cut these out at 1" but you can cut bigger or smaller. And I used a glue gun to assemble as even my quick dry glue wasn't working for me. You can use any five petal flower on a cartridge, I also seen one that the petals weren't the right shape but I altered it in DS and it is almost the same as these. So anybody can make these, just have to pick which flower to use.

Go to my paper roses tutorial:  http://toolsofacropingqueen.blogspot.com/2011/10/paper-roses-tutorial.html


I really love these roses and have made hundreds of them. I make them in solid colours and white with the edges inked. I haven't tried patterned paper yet but I plan on it. I use a punch for the leaves I put with them most of the time but sometimes I cut them out on the cricut or I use one of my leaves dies by spellbinders or sizzix. And lots of times I accompany the roses and leaves with the branch MS punch, its so pretty and multi- funtional.  
Here's a card I made with these roses
My cousins b-day card, she loves animal prints and the colour blue ;)
I forgot to glue on the lil birdies legs, he's gonna get tired, lol
You can find the die and the stamp for the bird  Peahy Keen here

Thank you for visiting my blog today, I hope you found something you like. If so please leave me a word or two so I know you were here. :) Have a craft happy day!

Challenges I entered


10/26/2011

A "Clean & Simple" card

     Hello my crafty friend, ty for stopping by. Thought I'd share a CAS Wedding card with you that is fast and easy to create.
Start with a white 5X7 card base, cut a white mat slightly smaller than the base. Add a few score lines across the top section to frame your sentiment, mine is this gorgeous Cherish stamp, I basically bought this wedding stamp set because of this word, I love it. Emboss the middle section of the mat and use and edge punch across the bottom. I cut out a scalloped circle with a Spellbinders die and stamped the image. For a shinier effect heat emboss the word and image. Wa La done.....well the outside at least, lol!

Challenges Entered

     I used the "Textile" cuttlebug embossing folder from Provo Craft, the scalloped lace MS border punch and made four score lines on my score pal for the base. Not sure why but to me the scalloped oval looks like it was cut out of the card base when it was actually cut separately, stamped and adhered on top of the embossed mat.
I've made this card several times, although I used different folders and embellishments, I just love the elegance  and simplicity of the white on white with a hint of colour.
     Thank you for dropping by and I hope I have inspired you to get create something special, have a craft happy day!

Cindy

BCA card set

     Hello my crafty friend, ty for stopping by my blog today, glad to have you. I am a member of a great site called "The Outlawz" and they have a new challenge that starts everyday and each challenge runs for one week. A new challenge was posted for Monday's Greeting card challenge and it is in honour of breast cancer awareness month. Love it.....!!!!
     I started one of these cards last week but everything I was doing wasn't working so I set it aside. Today I went to start working on the twisted Thursday challenge and the card caught my eye. BAM...... a set of these popped into my head along with this design. I love it, what do you think?


      I used the largest Labels 10 Spellbinders die for the base in white,  cut the DP, mounted and added gems to the scallops. I used Spellbinders Ribbon banners and cut mini letters from a quickutz alphabet. The birds are a Peachy Keen Die, love that bird :) sooo cute. I cut ea. bird twice in pink, inked edges and along the detail cuts in the wings and tail feathers to make them stand out. Glued just the bodies together not the wings or tail feathers so they could be gently curled up for a fluttering effect. I thought these would make a great gift set and I plan on making a box for them, not sure if I will buy a $ store box to decorate or make a something with paper.  I  will edit later with the company name of the DP's, I know they came in a BCA kit last yr but can't remember the name of the company. i hope it's on the paper cause I don't have the pkging. 


     I hope you've been inspired to create something beautiful with your stash today. Thank you so much for stopping by to see what I made. If you like it please leave me a comment, I appreciate your taking the time to visit and your words of encouragement. Hope your having a scrap happy day!  :)

    I entered this card in these challenges:
The Outlawz:  Mondays Greeting Card Challenge: Pink Awareness
Peachy Keen Stamps: Let's Face It Friday challenge: Windy
Paper Cutz Challenge #114 "In the Pink"
Make It Monday #60 
The Corrosive Challenge blog: Flying Things
The Pretty Little Ribbon Shop: Anything Goes
Scrappy Frogs Challenge Blog: Something that Flies


Cindy

10/24/2011

My sisters birthday card

     Hello my crafty friend, ty for stopping by today. I am sharing the Birthday card I made for my sister. Her birthday was yesterday and unfortunately we live almost an hour away from each other and since I haven't been well this week was unable to visit her and give her this card. Yesterday was the first day I was in my craft room all week, man did I miss it :)  I love it in here!!!
     Anyway, since I couldn't visit we talked on the phone and I told her I was going to email a pic of it to her inbox at work so she could at least see it before she actually "see's" it. When I got up this morning I went straight to my email. YUP she replied...I knew she would, lol, and she was capital lettering everything, how much she loved it etc. etc. and she said that it brought tears to her eyes. Awwwwww, I didn't intend to make her cry! LOL That touched my heart...I love her so much!
     My sister has the strongest love of the combination of black and red. Every time I make something and show it to her she says OMG can you make me one of those....in black and red! LOL LOL And yes I usually oblige. She wants one of everything I make for her to keep and one to give away, LOL. She is my biggest admirer/supporter of my creations. She has a creative mind too but she doesn't have the time or the drive really to spend as much time as I do. This is my passion and I spend as much time as possible playing with all my toys, I have to, I have a huge investment in this room. LOL 

Sooo here's her card

Challenges I am entering this card into

CARD RECIPE:
 6X6 white card base.  I printed the sentiment off the computer, cut and mounted it to the base. Cut 2 black squares slightly smaller than the base and cut a hole in the centre of both with a Spellbinders Nestabilities die. I glued one to the base and set the second one aside. I glued pop dots all over the black part of the base. I then made and glued the rest to the piece I set aside and lgued it to the pop dots so the over hanging items would create a shadow.
 I made all the roses by hand using a 1" 5 petal flower punch by EKSuccess. The red swirls and green leafy branches are cut out from Sizzix dies and the butterflies are cut from the Butterflies Die-namics dies by My Favourite Things. The larger butterfly is actually solid, I used punches for the 2 circles sizes and the hearts.
 I cut two of each butterfly, using the die in the red/mustardy paper and once in black cs for the larger butterfly. For the smaller one, I traced the die, cut it out inside the trace line and glued it in between the two red ones. Before gluing the three pieces together for each I put double sided tape over the holes in the wings, glued together then dipped them in black glitter. Added the gems to their bodies and the swirly pearls under them. The larger butterfly is pop dotted up off the card. All the red gems are heart shaped.

     I hope you enjoyed my little story and this card has inspired you to get crafty! If you like my card please leave me some love and let me know you dropped by today, and thank you so much for taking the time to look.
Cindy

10/22/2011

Son & DIL 1st Ann. card


     This is the card I made for my son and his wife's first anniversary. The couple is cut from the Love Struck 2010 solutions cricut cartridge @ 3.75. I then cut out the shadow cut of this after welding the word "Happy" to the bottom tip of the heart on my gypsy. I haven't managed to find what cart I got the sentiment from. I do know that the 1st is from a different cart than the words.  The background paper is like a tissue paper that has fibres between two layers, really pretty paper I have had for quite sometime. I added the brown pearls to the corners and lots of blue gems to the couple die cut. 

Thank you for visiting my blog today. I hope I have inspired you to make something fun, and that you are having a scrap happy day. :)
Cindy

Baby Girl Name Frame

     I know, it's another baby name frame sry, LOL! This one was for my sister's great niece's  first birthday. Ever since my sister's niece was born her father has called her monkey. Everyone calls her monkey and buys her monkey related stuff and she loves the huge collection she has. When she had a baby last yr it carried over to her, and now she is also known as Monkey. For her frame I decided monkey's was the way to go and thought a jungle looking theme would be kinda cool. I layered and layered different shades of green leaves. I had this green decorative kind of leafy stuff, sry I don't know the name of it but I used it in clear vases. It is stringy and I thought it would work well for vines. I cut all the stems off a few pieces and glued them on before adding more layers. Cut out two monkeys with my cricut and fancied them up a bit. The faces are Peachy Keen faces from the set that was made for the animals on the New Arrival Cart. Made the diapers out of felt, glued bottles in their tails and made the soothers from another stamp set by PKS. I cut a small rectangle piece of brown and made several cuts into it, folded the piece a few times and curled the strips  then glued on for the hair adding a flower shaped bling for a hair bow. Used glossy accents on the eyes, then added a tiny dot of white paint. Glued the letters to the "vine" that the monkeys are holding up across the frame. And added some tropical flowers from the "life's a beach" cartridge. 


The babies name is Tenley not Jenley, these letters were chosen and we didn't notice the T looks more like a J until I made it.....oh well, Mom didn't mind at all, as she loved the frame.

Thank you for stopping by my blog today. I hope I have given you the inspiration to create something fun. I hope your having a scrap happy day! :)
Cindy

"Cake in a box" tutorial

     Hello my crafty friend. How are you today? I hope all is well with you and yours. I decided to do this tutorial because on occasion I receive personal messages from the wonderfully talented ladies over at the cricut msg board wanting to know if I will share my cut file for the cakes in a box. About 4 yrs ago now I saw a cake in a box that someone made and they said they used the sizzix die for the cake. I loved this idea and decided I needed to make cakes in a box as well. However, I couldn't find the die any where. Luckily I had Design Studio and decided I would design my own template to make the cakes. I placed 3 circles on the mat in the bottom 6X6 square. 3"  2.5" and 1.75".  In the top half of the mat I placed 3 rectangles 1.25" deep each at 10.25", 8.25" and 7.25". I haven't used this file for quite some time as I just make the strips by hand now and cut out the circles with my spellbinders dies, so I am not sure how much too long these are, but better to long than to short right. I just cut off the excess triangles, tuck in side and glue. Along the top edge of these rectangles I welded tiny triangles. After removing my cuts from the mat, I score the rectangles along the edge where the triangles meet the edge and fold all the triangles down. I then carefully glue these triangles to the very edges of the circles to make the layers for the cake. Then glue them on top of each other and decorate.
     For the box: take a 12X12 sheet of desired CS, I score on two sides at 4" and 8", then cut out the four corners. You can leave them attached but the box doesn't fall open to get the surprise effect. Now the lid is basically at your discretion as long as the inner square is 4" or slightly bigger, its up to you how deep you want the sides to come down the box. I usually will take a 6X6 or 7X7 square, and score at either 1" or 1.5" on all sides as well as at the 4" mark. For the 4" mark I line up my paper then move it very slighly to the left before scoring just to give it a little bit of room so it isn't to tight. This depends on the thickness of your choice of CS also. If it is thinner weight you don't really need to do this, but with thinner CS the sides sometimes tend to bulge out.
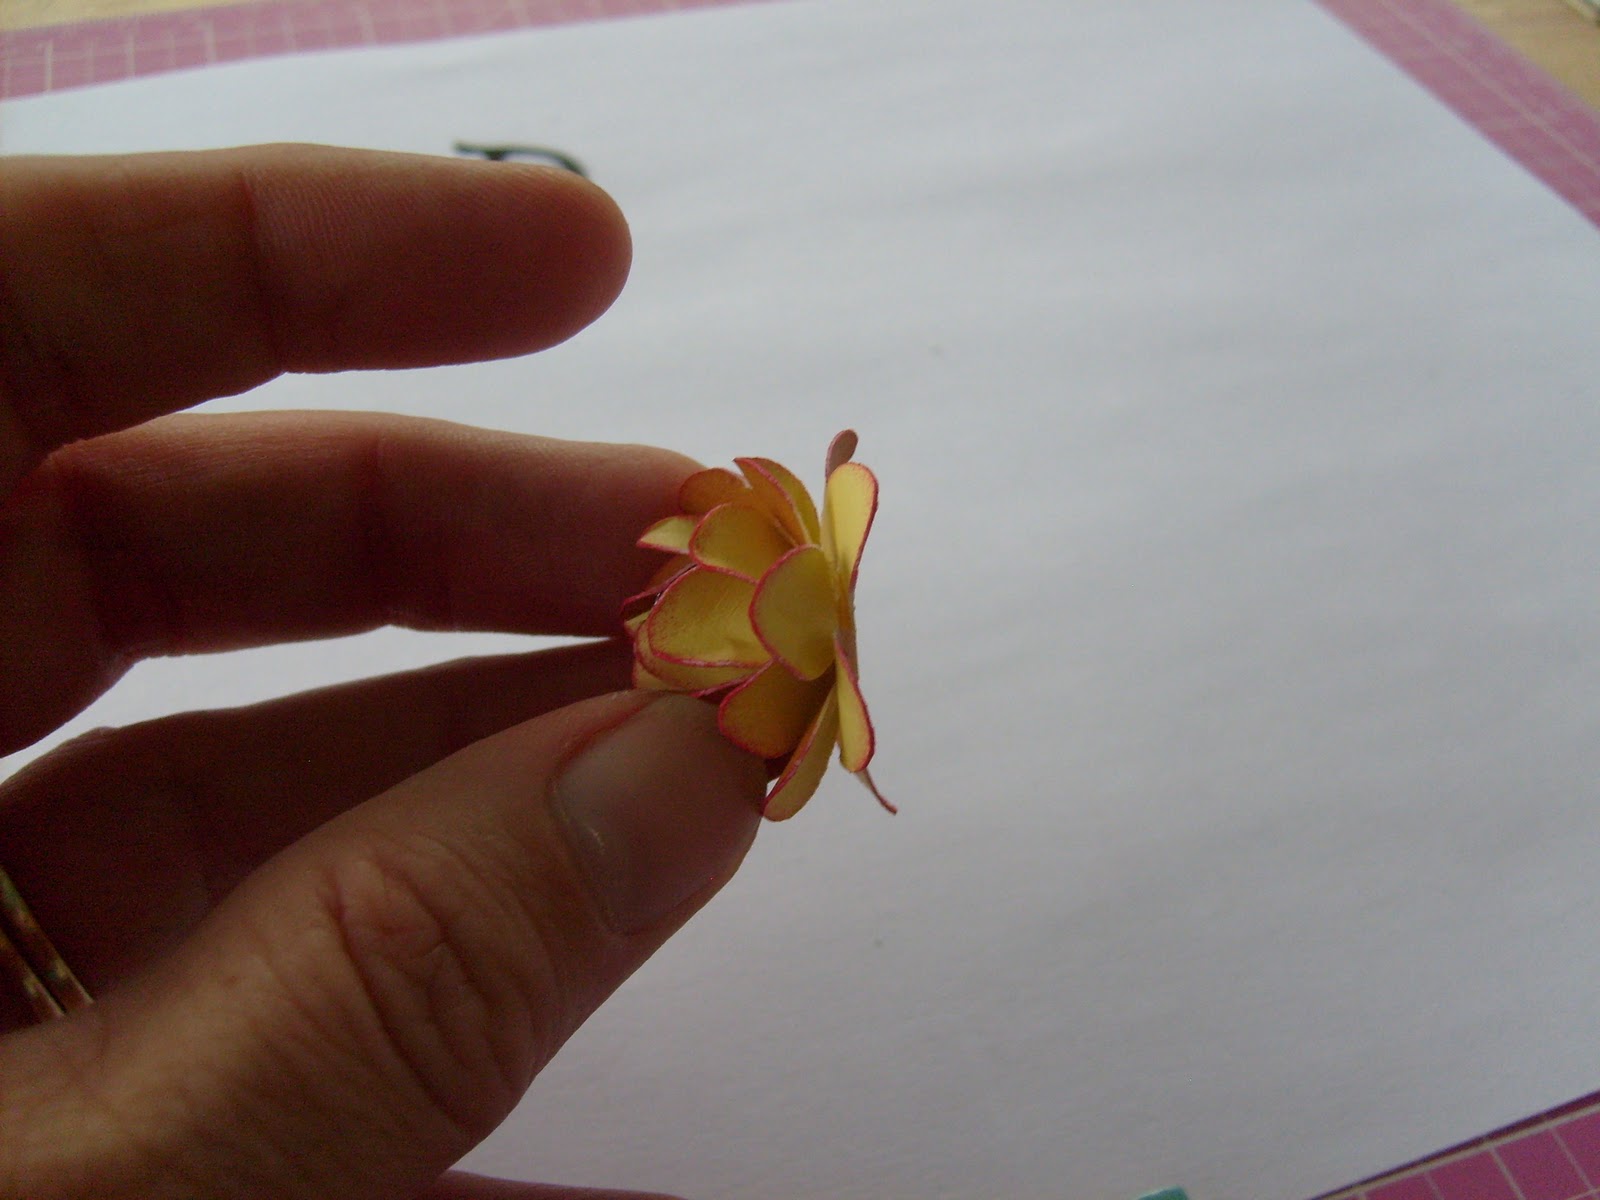
     I have added a couple pics for this tutorial but the circles were made with spellbinders dies and the strips were done by hand but it is the same thing, and the result is the same. I am including them so you have a visual of my description. The yellow scalloped circle goes under the doilie so that some of the chosen colour shows through under the cake itself. This is a preference, and is not necessary.

This pic has the yellow and white quilled roses I made for the cake, but I didn't use them, as the bride isn't having any roses in her wedding so I used other flowers for the cake.
This is the cake I made with these strips and circles....
I need to remember to glue all the glass seed beads on before adding the flowers so they will be straight all the way around. To change it up a bit I had a ribbon that has a pretty scalloped edge on each side and a plain strip down the middle, I cut the edges off and glued to the cake instead of the seed beads. The decorating ideas are endless I think, its like decorating an actual cake for me, as I used to be a cake decorator yrs ago. I like these better, no body cuts a big chunk out and ruins its beauty. LOL LOL This particular cake in a box still isn't finished. The cake topper I make by glueing a double heart charm on a strip of pkging the carts come in. When dry I cut around the charm and make the lower part slighly narrower than the widest width of the charm. Cut this section up the centre, and fold these two strips in opposite directions. I cut another circle for the top of the cake and put a slit in the very centre, put these strips through the slit together and refold them in opposite directions. Then glue this whole piece to the top of the cake. Then add the seed beads to conceal the second layer on the top piece. I hope this makes sense as I didn't take any pics for this step.
     I hope you enjoyed and understand this tutorial, if you have any questions I'd be happy to answer them. I would love it if you share pics of your creations with my tutorial. You can email them to me at cynpot@gmail.com.
     Thank you for stopping by my blog today, I hope your having a scrap happy kind of day :)
Cindy

10/21/2011

"Thanks" tickets

     Hello my crafty friend, how are you today? I hope all is well with you and yours! Today I thought I'd share a project that I did for a girl a couple yrs ago now. She was getting married and asked my sister if we could make 500 tickets that say thanks or thank you on them for the guests at the wedding. My sister called me and we set to coming up with something for her. She said they wanted to give each guest two tickets for drinks on them at the reception. We made several different ones and then decided on which one we felt looked the nicest and was easiest to read. My sister figured I could make 500 and pair them up by tying two together with a brown or green ribbon. We tried several different ones tied together and they didn't sit right, they seemed to bulky to me. And not easy to rip off of the ribbon one at a time. 


We decided on this style and as I was making them I was thinking oh my lord, this is gonna take forever. After I made about 200 of them I thought heyyyy, why don't I perforate the tickets in half to make one ticket equal two. So that's what I ended up doing. The bride and groom loved the tickets and the idea of the perforation.
When I was done making all 250 tickets, I wanted to present them in a nice way to them, not just hand them a couple stacks of tickets in a shopping bag. I had this dollar store box hanging around and it was the right colour so I put the tickets in and they filled the box perfectly. So I made a fancy cover to glue to the lid, cut out a flower pot on the cricut and the flowers I needed to make the paper roses.
 These paper roses I learnt how to make yrs ago by a very talented lady and her blog is Susan Bluerobot, this is the link to the directions to make these roses: http://susanbluerobot.blogspot.com/2008/09/how-to-make-paper-roses.html
 My sister seen a gift bag at the dollar store in the right green so I cut out the stamp in brown and the bride and groom in cream and adhered to the front of the bag, much nicer way to present them to the bride and groom. They totally loved the tickets and appreciated all the work I put into making them. Since my sister was working full time and I was on sick leave from a surgery mishap I took the whole project on to give me something to do.

 "Thanks"  was cut with the cricut for some
  and the rest were done with the cuttlebug with the Ty set that comes with the embossing folder and the die cut template. I have a tin full of left over thanks and thank you's!
 The double heart is a punch.
     Thank you for stopping by my blog today, I hope I gave you an idea if someone asks you to make drink tickets for their wedding reception or other get together. Have a great day and Happy Scrappin'.

10/17/2011

How about another Baby Name Frame...

     Hello my crafty friend, how is your day going? Hope all is well with you and yours. I'm so glad you stopped by, because I wanted to share another frame with you. This one was for a little boy. When I was thinking about what to do on it, what theme to go with,  my sister said something about a frog and this idea just popped into my head. So much fun, I love his little Peachy Keen Face, those faces are awesome. If you don't own any PK stamps your missing out my friend. And I have both paper doll carts from provo craft for my cricut die cut machine. But for this little guy I only needed to cut his head, hair and hands. The outfit is a Jolee's sticker I got for $1.00, woot, I found a bunch more another day for 1.00 also and I bought them all. I think I have 7 or 8. when I run out I'll go back to doing things the hard way. LOL LOL but its sooo much fun.
     For the sticker I had to remove his arms and turn them around so the pattern would be on the outside, then I just put paper on the inside and coloured the red stripes on. The grass is my MS icicle punch cut twice and pop dotted. The wagon and dog are from the paper doll cart and the mason jars, I printed off the internet a small jar to use as a template to trace them. I used vellum and another vellum sticky paper over it, drew the lines and sticks and leaves. The lady bugs and butterflies and other bugs are from various sticker sets. The kitten in the wagon and the toad under it were chip board pieces I have from an old KC & Company set. The jar on the left side has hand drawn ants.  The wagon was cut three times, twice in red once in black. I cut the wheels off the black one, cut everything except the wagon bed itself off one of the red ones and pop dotted it up off the mason jars. I googled Radio Flyer to see what the logo looked like for the wagon brand and used a white gel pen to draw it on. The frame is a shadow box frame from Michaels.


Thank you for stopping by my blog today. I hope I have inspired you to create something fun for somebody!!

Pink Christmas Cards Rock!!!

     Hello my crafty friend, welcome to my blog. I entered this card into a challenge over at "The Outlawz", they have a different challenge each day of the week and they run  for one week with a chance to win prizes at the end of the month. This card is for Sunday's CAS Challenge. CAS = clean and simple. I took simple literally with this one cause it couldn't get any easier than this.
     I was looking in my scrap "patterned Christmas" paper drawer and pulled out this pink background paper left over from 6X6 gate fold gift card holder I made two yrs ago. It was already 6X6 and ready to go so I cut and folded a white base. Glued the pink background paper on and thought, ok...now what. When I looked at it the word Joy was just popping off the page begging to be framed!
     I used my   spellbinders Oval "Lacey labels" die and cut it out, then took a spellbinders "Classic Ovals" die and centred it and cut it again to create my frame. Then I was wondering what else to do, had to keep it CAS! I put a couple die cuts on it and a few stamped images but nothing seemed to look right. Then I pulled out my "Fanciful Holiday" die cut set and cut out two reindeer, I love it! There always has to be a Rudolph at the front so I popped a pink gem on his lil nose and called it done. :) Hope you like my card, I wish I had a whole lot more of this paper, I love it.

Challenges Entered

Thank you for dropping by and I hope you have a Scrap Happy Day! :0)

Cindy 

Paper Roses Tutorial

How about a tutorial.....
A few posts ago I told you about the roses I designed so I didn't have to keep punching out the 5 petal flowers I use to make my roses. The ones I cut with my cricut are almost identical to the punch I bought at M's. The great thing about making them with the cricut is you can make them different sizes. YAY!  I made this tutorial for all the ladies that hang out at the cricut.com msg board. Almost daily I was getting private msg's asking how I make them, would I be willing to do a tutortial. So I sat down and did one, but it's not a fancy smancy, I don't know how to do those yet, hopefully one day I will :0). Anyway this is an easy to follow tutorial that will have you making beautiful roses for you projects in no time.

Supplies I use, you can use what ever you prefer....these 5 petal flowers are from an EK success punch, they are 1" in size when punched.
curl the petals on one flower down slighly with your piercing tool, or a toothpick or thin paint brush handle, whatever you normally use to get this result
 pinch the tips of the petals on one flower down with your tool, or just use your fingers
pinch the tips of the petals on 3 flowers up

bring up two petals that arent beside each other and glue them together

 bring up and glue the three remaining petals

  take one the flowers with the petals pinched up, turn it over so the petals are now pinched downward, and cup it up, add some glue to the narrower ends of the petals and the bottom, attach the bud from the previous step, cup up till glue is set
 it should look like this

 repeat previous step for the 2 remaining petals turning as you go so your petals aren't lined up

 put some glue in the centre of the flower with the petals curled down


and your finished.....enjoy all your flowers ladies and gents, look forward to seeing your projects with these little beauties!!!! Try them and leave me a comment so I can visit your blog and check them out.


Here's a couple pics of these  on cards and an army of roses, lol!


I hope you liked my easy to follow tutorial, have a great day and Happy Scrappin'!!!!