Darling Butterfly

Followers

11/28/2011

I love snowmen

     Given the Season, the challenges are looking to the holiday season and a lot of challenges are looking for Christmas cards or what ever holiday your looking forward tooo. The Paper a la  Mode challenge at The Outlawz called for one this week. I made the snowmen a couple weeks ago which are from a bosscut die set, but I made a template to run through the die so the face won't cut out so I could use my Peachy Keen stamps for the faces. I keep a couple tins with cuts that I don't use when I cut them for one reason or another and in there I found the three trees I cut quite sometime ago with my cricut from one of my Christmas carts, like 2 yrs I think! And the string of lights were also in a baggie so they wouldnt get wrecked while waiting for a permanent home on a card. They are cut from a die that came in my 2008 Quickutz holiday die set. I put dimensional glue on the bulbs and then coloured with gel pens. All I had to do was figure out how to use these items to make a card and decided to make a scene. I found some background paper that kind of looks like a snowy night and cut two strips of white card stock uneven to look like hills and valleys.  Added snow write to the trees and the snowy ground. the middle tree and snow people are pop dotted for dimension. I really like making scene cards and how this one turned out. :)
 Challenges

Christmas Past meets Christmas Present

     The challenge I made this card for was The Outlawz Wednesday Sketch Challenge. When I saw the sketch I had two cards come to mind so I decided to make them as one. I love the way it turned out and am entering it in a few challenges that are asking for Christmas cards or cards with Christmas trees/or trees! Hope you like my card :)  The branches on the tree are the MS branch punch, the gifts are stickers. The curtain valence is punched with the scalloped border with mini hearts (MS I believe)
Challenges

Sleigh Ride


     Hello my crafty friend, ty so much for stopping by to check out what I have been up to. I wanted to enter a challenge over at The Outlawz where the criteria was Shapes and Snowflakes...I had so many ideas flying around in my head I had to sit just sit down and start working on one. The challenge was to make a shaped card and have a snowflakes/flakes somewhere on your card.I finally decided to go with a sleigh from one of the Christmas cricut carts (same name). It has a lovely design and can be left plain or dressed up.
    I used my gypsy to design the card base by welding two "blackout" sleigh images together, one of them backwards of course. I also welded on oval into the sleigh so I would have an area to glue in presents and allow more room on the inside for a sentiment and signature.  I then cut a single sleigh out twice. One with the oval one without. The one without was used to trace an outline of the opening so I would know where to glue the items going inside. The other one I inked the runners up and heat embossed them in silver. I cut off the sleigh body. I cut the sleigh again in red this time and cut off the runner. I ran the white base without the oval  and the red body part through the xyron and glittered. I then put $ store stickers on cs, cut out and glued in place. Then I glued all the pieces together and added snow writer to the white designer cut on the top section of the sleigh. Added the sentiment from my sticker stash. 
Challenges
      When I finished this card I was soooo happy with how it turned out that I really want to make more. I think this is by far my favourite Christmas card I ever made, it was my black and white one for like 3 or 4 yrs now, but I believe this one has kicked it to the side. If you like my card please leave me a comment and I will pop by your blog and take a boo around yours tooo :) Thank you so much for visiting me today and I hope your day is scrappy1

Cindy   :)

Season's Greetings

     Hello, welcome to my blog, I hope I can inspire you to get those Christmas cards done for all your family and friends. This weeks Wednesday sketch challenge was so pretty I really wanted to get in on this one. My card has a different take on the challenge as to what I would normally do, but since I am building my Christmas card stash I figured as long as it follows the basic sketch I'm good. Let me know what you think of my card so I can drop by your blog and see what you have been up to lately.


Challenges

     I hope you have yourself a scrap happy day, and be safe! 

    Cindy    :) 

Christmas present - card

     Hi, welcome to my blog, I hope I inspire you to get crafty. Please take a look around and leave me some love so I can come check out yours.  Over at The Outlawz I was checking out the challenges for the week, and trying to get ahead of it this time instead of rushing hrs before it's due. The challenge for Monday greeting card was Gift wrapped - birthday/christmas presents. When I read it an actual present popped into my head and I kind of chuckled at my self at the thought of a card that resembled a present. Then I thought, why not? I don't have stamps with a significant sized present on it, they are all small ones from the studio G $ sets. Everyone was making awesome cards with all the great images that had presents you could see without a microscope, LOL! Ok it's not that bad, but any way like I said I figured why not, I grabbed some "gift wrap" looking designer paper because I was too lazy to dig out the actual gift wrap, (lol), measured, cut and added ribbon to it then mounted it to my card base. I cut some strips to make the bow but because of it's small size I was having trouble putting it together so I only made the one layer, rather than two. I cut a tag with a sizzix tag die and stamped a sentiment on the front and  to: from: on the back. I had to stand the card up backwards to take the pic so the tag would sit right, so if the background looks a little odd it's not you! LOL Anyway here's my card, kinda cute, and very easy, would make a great CAS card to I think. 

Challenges

     Have a scrap happy day!

  Cindy  :)

"New Baby" easel card

     Hi again, thank you so much for popping by. This time I have an easel card for a new baby. My nephew and his girl are expecting a baby boy in April and peachy keen had a sketch challenge that required us to do paper piecing. Now I know we are to paper piece a stamped image, but I have seen some projects entered that have their cricut cut out's paper pieced and I knew exactly what image I wanted to use for their card.
     I used a face from the PK-570 Basic Paper Dolls Face Assortment. Using the everyday paper dolls cart, I welded a head to the babies pajamas on my gypsy and cut it out. Used markers and ink pads to colour the hand and face/hair on the cut out, then I cut the pajama's three times so I could cut and layer the pieces to add dimension.


I pop dotted the baby 
Challenges
     I hope you have been inspired to get creative with all your scrappy stuff, after all that's what it's for! LOL If you like my card please leave me a comment so I can drop by your blog too and check out what you've been up to. Hope your having a peachy day while scrappin' away. 

                 Cindy   :)

11/27/2011

Peachy Keen recipe Challenge

     Hi my crafty friend, so happy you dropped by today. I have been very busy working on lots of challenges. This one is a recipe challenge for peachy keen. This recipe has been a tradition for as long as I can remember and there is usually more than one pan made per Christmas season. It was my grandmother's recipe that we all loved. I was raised by my grandparents and when I was a young teen my grandmother showed me how to make it and it later became my tradition. Since she passed I am the only one in the family that still makes it, and I love it. I usually make two large square pans by doubling the recipe, saving one pan for my house and the other gets divided in two. Half is a gift for my brother, the rest a treat to take to my cousins house for our annual family Christmas get together on New Year's Eve.
     I am really happy that Peachy Keen had this challenge because I have wanted to do a 2 pg LO of this recipe for a few yrs now, this just motivated me to go ahead and get it done :)  My aunt is looking forward to seeing it and she will probably get motivated to do one for herself as well. Which will be great because it's so neat to see how other's perceive a challenge and using the same idea and pictures, how different the LO's will be, I can't wait to see hers. Warning you now, this is a pic heavy post, LOL! But I don't want you to miss any of the little details!
The first pic is of the 2 pg LO, the rest are the pg's individually, full pic's and close up shots. Please check them all out, the recipe is typed within. Who knows, it just may become a traditional recipe at your house tooo!!! That would be awesome.
MUCK ~ N ~ GOO


That's what my grandmother always called it. We don't know where this recipe originated from and didn't really care, we only wanted to be sure it was a part of every Christmas get together.  
1 pkg. miniature marshmallows, 1 can sweetened condensed milk, to pkg Mr. Christie Chocolate wafers...crushed or 1/2 a box of Oreo baking crumbs. Desired amount of sweetened flaked coconut.
 Grease a 10X13 baking pan, (glass or metal), sprinkle bottom with coconut to thinly coat. Mix remaining ingredients together well. (my hubby had to do this part for me, it's to hard for me to mix now).
 Spoon the mixture onto the coconut in large dollups, this isn't real easy to work with and needs to be done kind of quickly, the longer it sits the harder it is to move around, spreading really isn't possible, LOL. Sprinkle the top to lightly  coat with more coconut. Let set. For the purpose of this post I cut a piece out of it just to take a pic, once set it will be nice and neat on all sides. But it tasted just as yummy unset, LOL!
                                                                              ENJOY
Ohhhh YUMMMMMM.....
The original recipe calls for chocolate wafers by Mr. Christie, but they have to be crushed and I am unable to perform said task at this time so I opted for the Oreo Baking Crumbs instead, they were also on sale close to a $ cheaper than the wafers....it's a win win!  :)


I used a few different PK-570 Basic Paper Doll Face Asst. stamps on the marshmallows and a variety from PK-493 Everyday Character Faces Parts and MORE on the chocolate wafers!!  I printed and cut out pics of the ingredients, mounted on white cs and cut out to frame. I used spellbinders classic circles to cut out the chocolate wafers and classic ovals to cut out the coconuts, then did a bit of hand cutting to reshape. The bowl and apron are cut from  Everyday paper dolls. I cut the bowl once ea in red, white and very light brown and the apron once ea in christmas designer paper and white cs. I then cut the lower part of the patteren paper away and glued to the white one to give it a lace trim, then I used a 5/16 whole punch to add the hole for visual effect. The white strips cut with the MS drippy goo punch are to represent the sweetened condensed milk. The recipe card holder is a premade pocket that came in my 2008 quickutz Christmas die cut set to hold the recipe ingredients and instructions.  


 I stamped the pattern on the bowl with white pigment ink then used the heat tool to set.
 Hand shaped coconuts....not bad I guess. 
Challenges

     I hope I have inspired you to do layouts of your fave holiday tradition recipes. They will be all beautified for generations to come. What a fabulous recipe book that would be filled with family favourite recipes....I think I am going to start one and this is the first LO for it...YAY! Thank you PK for the idea. Glad you stopped by today, hope your day is scrappy in the peachiest of ways!  

                      Cindy   :)


11/21/2011

Love Easel Birthday Cards

     This one is for a very good friend of mine for about 20 yrs now! She loves purple and the tues. colour challenge over at The Outlawz was to make a card using lime green, white and azure purple and add flowers. Right away I knew I could use these colours to make my friends card and enter it in this challenge at the same time....WOOT! Then I was looking around at a few other places to play and through an email from a very crafty friend I happened upon a wonderful challenge site called Totally Gorjuss, and they aren't kidding, perfect name. The challenge this week is to go Swirly Wirly, and have swirls, whirls, flourishes etc on your project somewhere, and who doesn't love to add swirls etc to their projects, I know I do. So I added a flourish of gems, and the paper kind of has some swirly effects going on, LOL. So here's my card:
Challenges
     The background DP is from a book of papers by Paper Pazazz - Hot off the Press, the dp paper with the flowery image on it is by unkown, it was in my scrap drawer and I have had it a long time, was saving this piece for just the right project. I made the rose and glued it to a prima flower, punched and shaped some leaves for around the flower and added the bling. 
     Thank you for popping by my blog today, I hope you like my card. Leave me a comment and let me know what you think, I love to hear from you. Until next time have  a scrap happy day!

Cindy  :)

Emma's two!

     Well here's another one of those oh so sweet cards where I get to use the cutest peachy keen face stamps on the animals from the New Arrival cricut cart. A friend saw pics of the cards I made with the monkey and the number one and asked if I could do one for a little girl who was turning two and adored elephants. Of course I can :)  LOL LOL


     Elephant cut at 3" from New Arrival and the #2 is cut from Plantin Schoolbook at 4.5" shadow and reg. The balloons are from a quickutz thin die and stamped with sentiments. Balloons have embroidery thread for their strings attached to his tail. Birthday hats, cupcake and  presents are stickers, and the grass cut with the MS icicle punch. Letters on inside were cut using  quickutz alphabet dies.
     I'd like to thank you for dropping by my blog today to see what I have been up to. I hope all is well with you and yours and your have yourself a scrap happy day :) If you like what you see here please leave me a comment and let me know, I truly appreciate your feed back. TIA

Hugs    
           Cindy  :)
     

Another first Birthday card

     One of my grand nephews turned one last month and this is the card I made him to go with his baby name frame (not posted yet). I love making these monkey's because the peachy keen face stamps make them so adorable, and hey don't we call babies little monkey's, I know I do!!! The card recipe is basically the same as the first one I posted just cut slightly different to leave the area across the bottom for a bolder sentiment. The balloons were cut once again with the quickutz balloons thin die and stamped with the studio g stamp set. The letters for his name and number across the bottom were cut using a Sizzix alphabet dies set. The monkey and number one were cut with my cricut and the gypsy. Monkey from the New Arrival cartridge and the number one from the Plantin Schoolbook cart. The diaper is made from a piece of felt and the strings from the balloons are embroidery thread. I didn't give this lil guy a soother because my grand nephew doesn't use one.

     Thank you so much for visiting me today and seeing what I have been up to lately. I hope you have been inspired to go be creative and have yourself a great day. If you like my card please leave me a comment about it, thanks in advance and take care of yourself.

Cindy  :)

Peachy Keen Thanksgiving card

     Peachy Keen Connection asked us to make a "Thankful" card or project. I made two cards, one was a snow woman juggling snow balls that had letters on them spelling out "Snow Many Thanks" for my BFF and this cute little penguin easel card.
     My aunt placed a nice size order from PK a few months back and brought them to my house and left them here for me to use...YAY! I got this idea in my head and kind of chuckled about it then thought, why not....it's cute. I used the penguin stamp on a plain white classic oval spellbinders die then mounted it on a lacy oval. Made a 4X4 easel card base, added some dp and assembled. For the penguin I coloured his body, hat and feet with gel pens. Added opague glitter glue to the hat trim and stamped the image again on dp, cut out the vest and glued in place. Made a fancy die cut for the hand written sentiment and pop dotted it off the base. I didn't win the prize but I did get a couple laughs and compliments on this card, what more can I ask for :)
     So grateful that you stopped by my blog today to check out what I have been up to. If you like this card please let me know and leave a comment for me, I sooo look forward to your comments, they encourage me to make more fun cards to show you. If I put a smile on your face or a feeling of warmth in your heart then I am happy, because it's better to give than to receive and if it makes you happy for a few moments then I know you weren't sad, and that means a lot to me. Have a scrap happy day and take care.

Cindy :)

First Birthday card

     This card is so much fun to make, I have made several of them, in girl colours, boy colours, and ages one to three with different animals on them. Occasionally I forget to take a pic of the card though when someone thinks to ask me to make one and they need it yesterday, so to speak, LOL!!!
     I started with a pink 6X12 card base folded in half, Matted a purple layer, white layer and bday dp layer. wrapped a ribbon around the last three layers and added a bow. Cut the one in white shadow then the pretty dp paper on reg cut with my cricut from the Plantin Schoolbook cartridge using my gypsy. The "balloons" are cut from a quickutz thin die, then stamped with $ studio G stamps from M's. I used embroidery thread for the balloon strings and cut out the monkey from the New Arrival cart with my cricut using the gypsy. I make the tuft of hair from a small piece of cs and cut it part way through several times and curling. The face and soother are Peachy keen stamps that were created for the New Arrival cartridge, makes these little animals soooo much cuter than cutting out their faces. I made the diaper from a piece of felt and the flower is cut from Life's a Beach cart and the grass was cut using the MS icicle punch. There is a little candle on top of the one :)
     I'm so happy you dropped by my blog today, if you like my card please leave me a comment, I look forward to hearing from you with compliments, suggestions and even invites to visit your blog.  I hope you have a scrap happy day, take care.

Cindy  :)

Stained Glass Easel card 2

     My stained glass easel card 2 uses another one of the images we were given by Anne Fenton and Sandi Hugget over at The Outlawz site to use for their creative freebie challenges. The first challenge the ladies gave us two each of their hand drawn digital images and let us create with them how ever we liked. For this card I made another easel card but this one is a different style. I used a 5X7 card base turned the long way and scored down the centre to give me a short fold to mount my image to rather than the whole width.
     I printed the image on acetate, turned it over and coloured the back side, then filled in the coloured areas with stickles and glitter glue. I let the image dry over night then cut it out. I printed the image on white cs  and cut out the paper image to glue to the back of the acetate to give it stability since it would be sitting up above the folded edge when in the easel position. I really like how this card turned out but doubt I will make another one since it was so much work, LOL!

Challenge
     Thank you for popping by my blog today, I hope I inspired you to make something perhaps using this stained glass technique, the images come out so bright and sparkly and Christmasy. If you like what I made please leave me a comment letting me know, I love to hear from you. I hope you have yourself a scrap happy day!

Cindy  :)
     

Lest We Forget

     Thank you for stopping by today to see what I have been up to. I made this card for Remembrance day to honour all the men and women that lost their lives and for all the one's that came home. My grandfather was one of those that made it home safely and he was never able to talk about it. He tried to share a story with me once but he got very emotional which made him angry and said he'll never speak of it. The years that had passed since those horrific events didn't make the memories any less raw for him. I love him and miss him dearly, wish everyday that he was still here. We all called him Poppy, how fitting a name which came about when my cousin couldn't say grandpa so the nick name stuck.
     I also decided that I would enter this card into the Saturday's Paper a la mode challenge over at the outlaws to create a project to honour a veteran or veterans or the military. I bought the 3 poppies and went to work on my card. Used the stars cuttlebug embossing folder for the background paper, wrapped a grey ribbon around it and stuck the pins in the ribbon before attaching to the card. I drew and cut the cross, used a ribbon tag and hand cut out the little tag which I hooked a heart brad through.
Challenge

     I hope I have inspired you to be creative today, or just reminded you of a loved one you've lost either during or since the war and their memory brings some joy and gratitude to your heart for their sacrifice and our freedom. Have a great day being scrappy!!! 

Cindy :)

My Niece's 25th b-day card keepsake

     Hello my crafty friend, so glad you had time to pop by today and see what I have been up to. One  of my many niece's celebrated a milestone birthday on Nov. 9th so of course I had to make her a special card to celebrate. I play over at The Outlawz and there was a challenge asking for raspberry, white and black, plus use either houndstooth or gingham designer paper. I knew I had gingham and thought I had houndstooth paper but not sure what colour I had. As it turned out I didn't have a single sheet of that pattern in any colour what so ever, sooo I created my own!
     I knew I had the cuttlebug houndstooth embossing folder by provo craft because I seen it on sale on line for less than $3.00 and just couldn't let the sale pass me buy even though I'm not a fan of this pattern. Glad I had this in my embossing folder drawer for this challenge though, and I rather love the way it turned out. I think Easel cards are so awesome and unique cards and thought it would be perfect for this milestone card I wanted to make.
     I cut out the base for the card in white and did all the scoring and set it aside. Cut out the mat for my image in black, traced the inside of the die on gingham and cut it out to make the image background. I found a piece of raspberry coloured cs, cut two rectangles to attach below and above the centre score line on the front of the card base. Ran the rectangles through the cuttlebug in the houndstooth folder and ran my brayer over it with black ink to create houndstooth designer paper. Coloured my image, which is not purple by the way, and the hat and purse are a deeper shade of pink. Made a few of my paper roses and did some shaping of the leaves for the decorating around the bottom of the image mat. Added a few rasp pearls and a butterfly from the $ store. Decorated the inside of the card to create the inside sentiment to match :) The card can be stood up like a regular card of set up in the easel format and it looks great either way. I sent pics of the card to my niece as we couldn't make it to her b-day supper and cake that evening. She replied with her initial reaction that she loved the card, thank you so much, then asked if she would be able to bring it home sometime or if I keep these specialty cards. Of course she can take it home, I can make another one, and I am going to for my other niece that turned 25 this yr.

Challenges
     This card was sooo much fun to make, I can't wait to make the other one for my niece :) Thank you for stopping by my blog today and I hope I inspired you to get creative. I would love to know what you think of my card and if you have made one like this or if you are now planning on making one like it. Have a great day and happy scrapping!

Cindy  :)

11/20/2011

Stained Glass Easel card

     Hi there my crafty friend, ty for stopping by. I have been saving the outer pkging from spellbinders dies and cricut carts etc. And find all kinds of uses for them on all different kinds of projects. A couple years ago I read about a stained glass technique using parchment paper where you stamp your image on one side and colour it on the other. The colours come through and make a lovely stained glass effect but the colours are soft, not rich and vibrant. When I make Christmas cards I like the colours to be rich and vibrant sometimes and stained glass is a technique that I feel should accompany the season. It reminds me of Sunday morning service and looking at all the stained glass windows that were so beautifully crafted and tell a story.
     Now my cards don't necessarily tell a story but they are rich and vibrant! I had the idea to try this technique with a piece of the pkging and I thought it turned out awesome so I set to making several cards in this unique fashion. For this card however I had to print the image onto a sheet of acetate since it was a digital image by Anne Fenton over at The Outlawz. Anne and Sandi Hugget have started a new series of challenges that run for 2 - 3 wks each. They supplied us with the first 4 amazing images and we were asked to make anything we wanted then share with them in the challenge to receive the next set of images. I think everyone that participated entered at least one project for each image, and the beautiful creations just kept coming.
     For my first project I decided on an easel card. I printed the image, turned it over to colour it in then filled in those colours with stickles and glitter glue. I let it dry over night then incorporated into my card with the stickles to the back so it is smooth and flawless looking on the front. I think this technique looks really pretty and used it on the next 3 images. Here's my first card....

Challenges

     I hope I gave you an idea of a different technique to use on your projects while recycling at the same time. If you like this idea let me know by leaving me a comment, it really makes me happy to read what you think of my idea and I would love to see what you make with this technique, so come back and leave me a link to your blog so I can check it out and follow you to.

Cindy  :)

Another CAS Christmas card

     Hello my crafty friend, glad you dropped by to see what I am up to today. I play in the challenges over at a site called The Outlawz. They have a different challenge everyday and it runs for one week. I made this card for a "mission embossible" challenge on Nov, 6, 2011. You could use any kind of embossing you wanted. I love this cuttlebug embossing folder from Provo crafts Winter Wonderland set, when I saw it I knew I had to have it. It is so Christmassy and wintery and flourishy, LOL. It also lends itself to quickly making perfectly CAS cards. You can whip up a dozen in about 30 to 45 minutes which is perfect if you need to make gift sets. I made several like this last yr in different colours, as well as a set of 15 in red and purple for my red hat society ladies.
Challenges
I used a pastel blue card base, made a white mat, rounded corners on both. Dry embossed the white mat, stamped the sentiment with ocean MS pigment ink and heat embossed it. Added blue pearls from the dollar store....done!!!
     Thank you so much for stopping by and I hope you like the card I made for the challenge. If so please leave me a comment and I hope to see you over at The Outlawz!!  

Cindy :)

11/10/2011

Creepy Cute with Peachy Keen

     Hello my crafty friends, so glad you dropped by to see what's new. I haven't posted anything for a few days, cause things have been pretty rough around here lately, and although I was crafting I wasn't in the right mind frame for writing. This post needs to be quick and I will have to update it later with the whole story.
     I am entering these paper dolls costumes into Peachy Keens Let's Face it Friday Challenge and am running short on time. If you have seen anything I've posted with their stamps you know how crazy I am about them. The challenge this round is to make something Creepy Cute...I don't know that they qualify as cute but I think I got the creepy part right, LOL!!! I made Hallowe'en costumes for some paper dolls and I have a rather lengthy story to tell about them. You will want to come back for this because it is quite the adventure. I am sooo thrilled to have been a part of it and I will be uploading more pics with the rest of the story in another post.
     On to the Dolls.....I used PK-493 Everyday Character Face Parts and More! that fit Cricut Paper Dolls 3" to 4" for the eyes on the Vampiress, the Vampire, and the Mummy. I created the mouth on the witch and the vampire with some masking tecniques and adding more than one stamp together to accomplish the shape I wanted. I added the vampire teeth with a tooth pick and white acrylic paint. The mouth for the Vampiress is from PK-573 Basic Paper Doll Faces (3'' to 4'') with teeth added in the same fashion as the vampire. The mouth for the mummy is from the same set as her eyes but it is turned side ways, coloured in with a black sharpie and the little line at the bottom of this stamp I masked so it wouldn't show.  Each of the costumes were created with the cricut with a lot of adjusting and sizing as well as some hand cutting to adjust here and there because the paper doll bodies aren't from the cricut series. It was very time consuming getting the outfits to fit right. The mummy was done by tracing her silhouette then cutting it out larger twice, and gluing together, then I cut and inked up several thin strips of white paper and glued on. Can't really tell in the pic unless you click to enlarge but they all have green faces except the mummy of course.


         Challenges
I am entering these Costumes into the LFIF Challenge at Peachy Keen!

     I hope you like my costumes and come back for the story behind the paper dolls! I will start a new post though and include a lot more pics of their Hallowe'en adventure as well as their adventures while visiting me
      I really hope I win a PK challenge one of these days, the prize for this one is a 25.00 gift certificate...OH Hhhhh my I could have some fun with that, biggest problem...I would have to make a decision on which set to get next, cause you know I want one of everything they carry. And they have a new line just out, Yeah that's right, I got the email about it the other day...check this out ~~~> PKKO's  oh my lord, can you say Love at first sight...H E L L O O O!!! I can't wait for things to change around here so I can buy stuff again...cause I just have to get my hands on ALL of these. I adore die cuts and these stamps so ya it's a no brainer that I would want them all. They have an awesome promo for the release...the whole set of the winter release promo stamps and dies for only $211.89. OMG I would so love to be on this band wagon!  Maybe if everybody prays and/or wishes me a lottery win before the 14th of this month I could by them all, well actually I would buy everything they carry but that's beside the point. Anyway...I would do the same for you...all you need to do is ask!!! LOL LOL 


Cindy :)

11/05/2011

Handmade Holidays Blog Hop 2011


click url above to be taken to the hop


     So glad I checked facebook this morning and seen this blog hop, of course I had to go hopping a long like a little bunny, are you kidding me. The talent that's out there and all the different companies that are on this 3 day hop, over 60 I understand. And they are showing off fabulous ideas for handmade gifts for your friends and fa ily member. Even if you don't win a prize your still a winner...there's tons of inspiration for great handmade gift giving. So come on, hop along with me, it will be fun, I am looking forward to making some of these great gifts. Have  a great day, good luck and happy hopping!! 

Cindy :)

11/03/2011

Christmas Easel Card

     I was trying out some new markers I bought with my birthday money and coloured up this image. Then I was thinking well it's coloured what shall I do with it. I love Easel cards and when looking through my Christmas stash I found this pretty striped paper that was already cut 6X6 and decided to make one. I saw a challenge over at The Corrosive Challenge Blog and decided to work a flourish into my design for challenge #136, "with a flourish".
Challenges
 Can you see the Flourishes? LOL They don't stand out to well against this crazy polka dot paper do they, but they are there I promise, LOL!
     Thank you for stopping by, I hope you like my easel card, they are so much fun to make and can be quite the show piece. If you like this would you mind leaving me a comment about it? Have yourself a scrap happy day.

    Cindy :)

Big Bad Crow Costume

     Hello my crafty friend, glad you stopped in today to check out my latest post. This card was made for the Peachy Keen Sketch Challenge #64. I love everything Peachy Keen and this little bird is just the cutest lil guy. When I saw him/her I had to have the stamp set PK-267 Happy Bird and Phrases, then I saw the Mother's Day set that has the smaller version of the Happy Bird, and then the Die cut by Scrapping Cottage to match the stamp. I am a sucker for sets, LOL! I really need to win some new sets though cause I am forever making cards with this lil guy, all my other stamps are faces, and I use them all the time but mainly for baby cards and baby name frames on paper dolls. The prize for this challenge is the PK Santa Set and since I collect everything related to Christmas I just had to enter. Ohhh I sooo hope I win this set, fingers crossed!!!!   My aunt is letting me borrow some sets she bought a few months back and I keep forgetting I even have them, so maybe the next LFIF challenge I'll pull those out.
     The new PK challenge was to follow a certain sketch and if you don't have any PK stamps, that's ok, your still eligible as long as you follow the sketch which of course you can flip. Anyway, I usually enter the Let's Face it Friday challenges where I have to use PK stamps but this week I had this card idea come to mind and decided to make it following the sketch. This is my entry for challenge #64, and if you want to enter you have plenty of time, it runs until November 14, 2011 so click on the link under my card and come join us for some super de duper Peachy KeenFun while your there check out their PKS Shop, you won't be disappointed in the selection they have going on for stamps and dies!  I actually want one of everything they carry, and one day when I win the lottery I will definately be placing a rather large order, YAY bring on the lottery winning numbers! Woot
     I thought it would be cute to have my little bird dressed up for Hallowe'en in his "Big Bad Crow" costume, LMBO, what do you think?
Challenge

     I used the Fiskars Maple Leaf punch for all the leaves, inked them up with some red and green ink and drew in the details. Don't mind my hand writing on the bottle cap, I am not a neat writer by any means and I really did try, it's not easy to write on a small shiny surface. The ghost's are tips of ice cream sticks I kept a few years back and glued black buttons to the backs. I stamped the image on black cs with frost white pigment ink and then heat embossed it with White  Pearls Translucent embossing powder. The bird is cut twice and glued to each other just at the body so the wings can be bent up, they are but it doesn't look like it in the pic. The branch is cut from a retired Spellbinders die set called "Bugs". I just cut a little triangular shape out of the orange cs to form the crows beak, and cut off a thin section of the head part of the bird in black cs, to make the crows bushy, hairy head feathers. I snipped it several times across the top and tried to make it look sort of ruffled. These two elements and the black colour make up Happy bird's big bad crow costume, LOL. 
     Thank you for dropping by my blog today, I hope you like my card and my humour. If so please leave me a comment and let me know if you liked it and thought it was funny. I love to read comments from visitors, it let's me know you appreciate checking out my cards and other projects and I hope that I am successful in giving you the inspiration to create something beautiful today. I hope you have a scrap happy day, until next time, take care and be safe!

    Cindy  :)

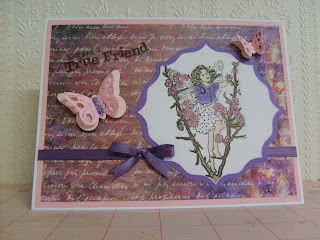
Just Because

     I made this card for a long time friend of mine "just because". We have been friends since before my first child's first birthday and he is 29. so a long time friendship, we have been through a lot together and have been there for each other through thick and thin over these 29 yrs.
     A few months back she was over for a visit and we were looking at some stamps I had gotten a few months before that. Four brand new Fairy sets that came out at for an introductory price and since I couldn't decide which set to get I bought all four.They were the new Fairyopolis collection by Crafter's Companion and they had one set for each season. My friend commented that she loves fairies and picked her fav one of the set so of course I had to make her a card. She likes a lot of different colours, not just one as she is a very colourful lady and a lot of fun to hang out with. I know she will love the card when she gets it, she keeps all my cards and looks at them often, she says she just loves them all.
Challenges

     Thank you so much for popping by today, I hope to see you again sometime soon, and that you leave a comment letting me know you were here. I really appreciate your comments and encouragement when you like something I've made.  Come back again soon, until then I hope all your days are crafty.

Cindy :)

Tues Colour Challenge

     Well I read the challenge, looked through my paper collection and thought...hmmmm what to do what to do. I actually made two cards for this challenge but didn't care for the first one, although a few other people thought it was great. Thank you ladies! I don't much care for this one either, I think it is the colour combo that is throwing me off.  The challenge was to use Navy, Rust and Mustard on your card and add a glittery embellishment. This is what I entered for the challenge. I should take a vote and ask for completely honest opinions about it. I'm not thrilled with it but I love the roses, they come out beautiful in any colour, YAY!
Challenges

     I hope you enjoyed visiting my blog today and didn't just close it when you seen this card, LOL! Maybe you found the inspiration to get creative and make something beautiful for someone you love. Thank you for visiting and please leave me a comment with your thoughts on this card. :) I hope you have a scrap happy day!

Cindy :)

Another Hallowe'en card

     Oh my goodness, talk about easy cards. This card is seriously 5 minutes, well after you have your embellishment or stamped image ready that is. This card was made for a Tuesdays Colour challenge with an oddball twist over at The Outlawz. They have a new challenge everyday that runs for one week each. At the end of the month if you link up your project after posting it on your blog you have a chance to win a great prize. Since the draws are done with a random.org type selector it's anybodies game. The challenge was to use Green black and orange and add a leaf or leaves.
Challenges

     For this card I took a white card base and added a black mat. Cut out a smaller green mat, embossed with the "Scroll Work" Cutlebug embossing folder and sanded to reveal the white core. Cut out an oval in the centre with my Spellbinders classic oval dies. The pumpkin was cut quite sometime ago from one of my cricut carts, I didn't use the top of the pumpkin cut, and I had cut the black handle to make it resemble the pumpkin bucket my kids use to carry when trick or treating as little ones. In pop dotted it up off the black are of the mat. added a few leaves and the Got Candy? sentiment and called it done!! 

11/02/2011

Snow Friends

     Heyyy, the best season of the year is almost upon us and if your like me you need a ton of Christmas cards. I like to make them all year round, cause I love Christmas and anything related to the season. That is really evident if you check out my stamp selection and die cuts, and carts and 3 drawers of Christmas paper alone etc. All other occassions DP are in one drawer  all together. LOL
     This card was so fast and easy so if your running low on time you can whip up a few dozen  of these in no time. The stam
s is one of my all time fav Christmas stamps from Inkadinkadoo, it's just the cutest image ever! I love it and use it every year on a few of my Christmas cards for friends and family.
Challenges
I made this card for the twisted Thursday challenge over at The Outlawz a few weeks ago. Card sketches and challenges are an awesome way to get your seasonal cards made, especially if you've lost your mojo or are just out of ideas on card LO's.
     This was the challenge info:  "Ok are you ready, grab a mixing bowl and a spoon, this week we have a RECIPE!!! First start with plain paper...NO patterns...then add a couple of critters, next add a swirl, and last throw in a bit of testure...and you have instantly and amazing card!!!"


     For this card I started with a plain white card base, and cut a plain white mat slightly smaller. Embossed the middle section with my "diving swirl" Cuttlebug embossing folder, using a technique with a red rubber gasket to leave the centre section un-embossed. Then embossed the ends with my "Crafts-Too" snowflakes embossing folder. I actually forgot to add the score lines Intended to add between the different embossed sections, which would have looked a lot better but I was trying to hurry and get the card done and posted in time. I stamped the image and coloured it, adding stickles to the snowflakes and let it dry. I cut out the sentiment with my 2008 Quickutz limited edition holiday gift set, ran through the Xyron and attached. Inked the edges with a co-ordinating blue ink, and added gems to the snowflakes for added texture and that touch of bling that goes with all Christmas cards. TaDa...done!!!
     Thank you for stopping by my blog today and I hope you found some inspiration to get crafty. Try out this easy to whip up card using your fav image next time you need a quick card for an unexpected visitor around the holidays. I hope you enjoy the holidays and the merriest of wishes to you and yours!


   Cindy :)